ADVERTISEMENT
Preparing the Oven and the Pan
The first thing you need to do is get your oven ready so it is nice and hot when your bars are ready to go inside. Turn your oven to three hundred and fifty degrees Fahrenheit and let it warm up while you do the rest of your work. While the oven is heating, take a square baking pan that is nine inches by nine inches and line it with parchment paper. Leave a little bit of the paper hanging over the edges because this will act like a handle later when you want to lift the bars out of the pan. If you do not have parchment paper, you can just rub a little butter on the bottom and sides of the pan and then shake a little flour over it so nothing sticks.
Creating the Crust and Crumb Base
In a large mixing bowl, you will want to combine the two cups of flour, the sugar, the baking powder, and the salt. Use a whisk or a fork to stir these dry ingredients together until they are well mixed and there are no big clumps of flour left. Now take your cold butter cubes and drop them into the flour mixture. You can use a pastry cutter or just your clean hands to rub the butter into the flour. You want to keep doing this until the mixture looks like coarse crumbs or wet sand with some small pea sized pieces of butter still visible.
In a small separate bowl, beat the egg with the vanilla extract and then pour this into your flour and butter mixture. Stir it gently until a soft dough begins to form. Take about two thirds of this mixture and press it firmly into the bottom of your prepared baking pan. You want to make sure the layer is even and reaches all the corners of the pan. Save the rest of the crumb mixture in the bowl because you will use it for the top later. Put the pan in the oven for about twelve minutes just to let the crust set and turn a very light golden color.
ADVERTISEMENT
Making the Lemon Filling
While your crust is in the oven for its first bake, you can make the star of the show which is the lemon filling. In a medium bowl, pour in the entire can of sweetened condensed milk. Add the half cup of fresh lemon juice and the zest from your two lemons. The zest is the yellow part of the skin and it holds a lot of the oils that make the bars smell amazing. Be careful not to grate the white part of the skin because that part is bitter.
Add the two tablespoons of cornstarch to the milk and lemon mixture. Whisk everything together very well until the filling is smooth and starts to look a little bit thick. The acid in the lemon juice will actually react with the milk to help it thicken up even before it goes into the oven. This is a neat little bit of science that happens right in your bowl.
Assembling the Bars
Once the crust has finished its first short bake, take the pan out of the oven very carefully using oven mitts. Pour your lemon filling directly over the hot crust and use a spoon to spread it out so it covers the entire surface. Now take the remaining crumb mixture that you saved earlier and sprinkle it evenly over the top of the lemon layer. You can use your fingers to break up any large clumps so the top looks nice and rustic with lots of little peaks and valleys.
The Final Bake
Put the pan back into the center of your oven and bake it for another twenty five to thirty minutes. You are looking for the edges of the filling to be set and the crumb topping to be a beautiful golden brown color. The center might still jiggle just a tiny bit but that is okay because it will firm up as it cools down. Once it looks perfect, take the pan out and place it on a wire rack to cool.
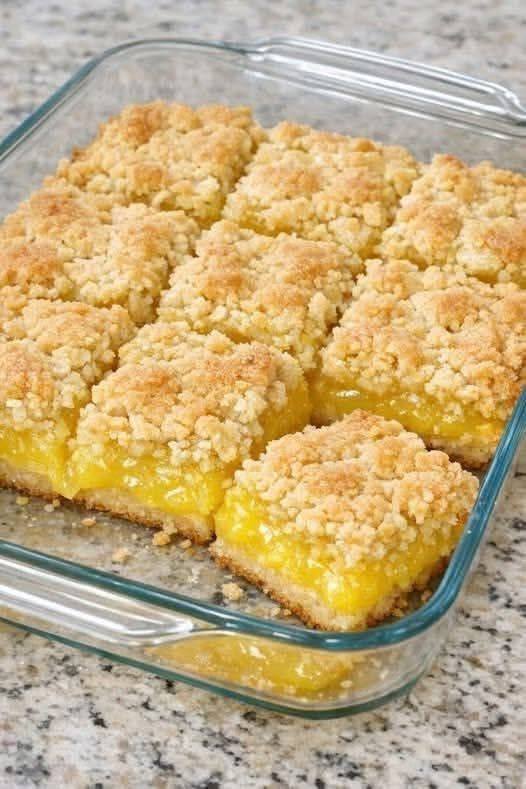
Cooling and Slicing
This is the hardest part of the whole process because you have to wait for the bars to cool completely before you cut them. If you try to cut them while they are hot, the lemon filling will run out and you will have a mess instead of neat squares. Let the pan sit on the counter for at least one hour and then put it in the refrigerator for another two hours. Once they are cold and firm, use the parchment paper handles to lift the whole block out of the pan. Use a sharp knife to cut them into sixteen squares. Right before you serve them, sift a little powdered sugar over the top to make them look like they came from a professional bakeshop.
Why This Recipe Is Special
This recipe is special because it focuses on the purity of the ingredients and the simplicity of the process which results in a dessert that feels very honest and homemade. Unlike many modern desserts that use artificial flavorings or bright yellow food dyes, these bars get their color and their taste from real lemons which makes a massive difference in the final quality. Lemons are a great source of Vitamin C which is important for your immune system and they also contain antioxidants that help your body stay healthy and strong. While this is still a sweet treat, choosing to make it at home allows you to avoid the high fructose corn syrup and the preservatives that are found in almost all store bought snacks.
The texture of these bars is also something that sets them apart from a standard lemon tart or a lemon cake. The crumb topping adds a delightful crunch that provides a contrast to the creamy filling which makes every bite exciting for your palate. Because you use sweetened condensed milk, the filling has a rich and milky undertone that softens the sharpness of the lemon juice and creates a flavor that is similar to a lemon cheesecake but much lighter and easier to eat. It is a very forgiving recipe which means that even if you make a small mistake or if your measurements are not perfectly exact, the bars will still turn out delicious and impressive to anyone who tries them.
Extra Tips for Better Taste
If you want to take your lemon crumb bars to the next level of deliciousness, there are a few small tricks you can try to enhance the flavor and the presentation. First, always make sure your butter is very cold when you start mixing the crust because this creates little pockets of steam in the oven which leads to a flakier and more tender base. If you have time, you can even put your flour and sugar in the fridge for a few minutes before you start so everything stays chilled.
Another great tip is to use a mix of different citrus fruits if you want a more complex flavor profile. You could replace a little bit of the lemon juice with lime juice or even a splash of orange juice to create a citrus medley bar that has different layers of sweetness and tartness. Adding a pinch of extra lemon zest to the crumb topping itself can also help the lemon flavor shine through even more. If you like a bit of a salty and sweet combination, you can sprinkle a tiny bit of flaky sea salt over the top of the bars right after they come out of the oven.
For those who enjoy a bit of extra texture, you could add some chopped nuts like almonds or pecans to the crumb mixture before you sprinkle it on top. The toasted nuts will add a savory depth that goes wonderfully with the bright lemon. Some people also like to add a handful of shredded coconut to the crust which gives the bars a tropical feel that is perfect for summer parties. Finally, always make sure to use fresh lemons rather than the juice that comes in a green plastic bottle because the bottled juice often has a metallic aftertaste that can ruin the delicate balance of your bars.
Final Thoughts
Baking these lemon crumb bars is a joyful experience that reminds us that the best things in life are often the simplest ones. There is no need for complicated techniques or expensive equipment when you have fresh fruit, good butter, and a little bit of time to spend in your kitchen. Whether you are making these for a special celebration or just as a treat for a quiet Tuesday evening, they are sure to bring a sense of light and happiness to your home. Sharing a tray of these bars with your friends, family, or neighbors is a wonderful way to connect with others and share a moment of sweetness in a busy world. We hope that this recipe becomes a staple in your collection and that you enjoy every single zesty and buttery bite of these wonderful lemon treats.
Nutrition Details
See more on the next page to continue reading →
ADVERTISEMENT
ADVERTISEMENT