ADVERTISEMENT
The first thing you need to do is find a standard sized loaf pan and line it with some parchment paper or grease it very well with some oil so the bread does not stick to the sides later. Take a large mixing bowl and combine all your dry ingredients which include the sunflower seeds and flax seeds and chopped nuts and oats and chia seeds and the psyllium husks and the salt. Use a large spoon or a spatula to stir these dry parts together until they are very well mixed and you can see an even distribution of all the different seeds throughout the bowl.
In a separate smaller bowl or a measuring jug you should whisk together your water and the melted oil and your choice of sweetener like maple syrup. Once these liquid ingredients are combined you can pour them over the dry seed mixture in the large bowl. Now you must stir everything together with a lot of energy because you want every single seed and oat to be coated in the liquid. The mixture will start to feel thick quite quickly as the psyllium husks and the chia seeds begin to absorb the water and turn into a gel like substance that holds everything together.
After you have mixed it well you should transfer the dough into your prepared loaf pan. Use the back of a spoon to press the mixture down firmly and smooth out the top so that the bread is compact and even. This part is very important because if the dough is too loose it might crumble when you try to slice it later. Now you must be patient and let the pan sit on your counter for at least two hours or even overnight if you have the time. This resting period allows the seeds to fully hydrate and creates the structure of the bread without using any flour or eggs.
ADVERTISEMENT
When you are ready to bake you should preheat your oven to 350 degrees Fahrenheit. Place the loaf pan in the center of the oven and bake it for about twenty minutes. After those first twenty minutes you should carefully remove the bread from the pan and place it upside down directly on the oven rack. This allows the heat to hit all sides of the loaf and makes the crust extra crispy. Bake it for another thirty to forty minutes until the bread sounds hollow when you tap it and it looks golden brown on all sides.
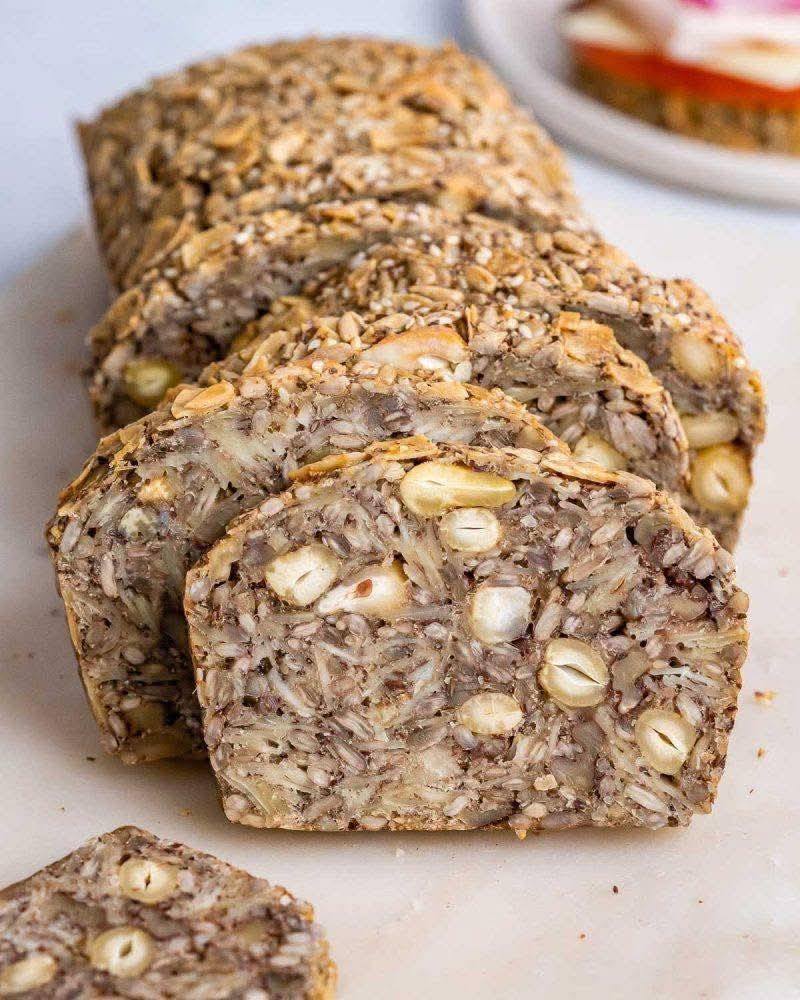
The most difficult part of this entire recipe is waiting for the bread to cool down completely before you cut into it. If you try to slice it while it is still hot the inside might be a bit gummy and it could fall apart. Let it sit on a wire cooling rack for at least two hours until it is totally cool to the touch. Once it is ready you can use a sharp serrated knife to cut thin slices and enjoy the amazing texture you created from scratch.
Why This Recipe Is Special
This recipe stands out because it completely redefines what bread can be by removing the traditional grains that many people find hard to digest. It is naturally gluten free if you ensure your oats are certified gluten free and it is also vegan since it uses no eggs or dairy products to hold the structure. The high fiber content is excellent for your gut health and helps you feel satisfied for a very long time which can prevent overeating later in the day.
Another reason it is special is the density of nutrients found in every single bite. Each seed brings its own set of minerals and vitamins like magnesium and zinc and healthy omega fatty acids that support your heart and brain. It is like eating a giant multivitamin in the form of a delicious piece of toast. The taste is also far more complex and interesting than plain bread as it offers a toasted and nutty flavor that develops more depth as you chew.
Extra Tips for Better Taste
If you want to take this recipe to the next level you can try adding some dried herbs like rosemary or thyme into the dry mix for a savory aroma. Some people love adding a handful of dried cranberries or raisins if they prefer a slightly sweeter bread that goes well with cream cheese. You can also experiment with different types of nuts like walnuts or pecans to change the flavor profile according to your personal preference.
For an even crunchier crust you can spray a little bit of water on the loaf right before it goes into the oven or sprinkle some extra flaky sea salt on top. If you find that the bread is too moist for your liking you can toast the individual slices in a toaster or a pan after you have sliced them which makes them incredibly crispy and brings out the oils in the seeds. Always store the bread in an airtight container in the fridge to keep it fresh for up to a week or slice it and freeze it so you can have a healthy piece of toast whenever you want.
Final Thoughts
Making your own no flour seed bread is a journey toward better health and a more intentional way of eating. It proves that you do not need complicated ingredients or professional skills to create something that is both nutritious and absolutely delicious. This bread will likely become a favorite part of your morning routine and you might find yourself sharing the recipe with everyone who tries a slice. Enjoy the process of baking and the wonderful feeling of nourishing your body with simple and clean ingredients that taste like a true treat.
Nutrition Details
Below is a table showing the estimated nutritional values for this recipe based on a standard loaf divided into twelve equal slices. Please note that these numbers can change depending on the specific brands of seeds and nuts you choose to use.
| Nutrient | Amount Per Serving |
| Calories | 190 calories |
| Total Fat | 14 grams |
| Saturated Fat | 3 grams |
| Sodium | 180 milligrams |
| Total Carbohydrates | 12 grams |
| Dietary Fiber | 6 grams |
| Sugars | 1 gram |
| Protein | 6 grams |
| Calcium | 4 percent of daily value |
| Iron | 8 percent of daily value |
ADVERTISEMENT