
Step by Step Method
Preparing the Cookie Base
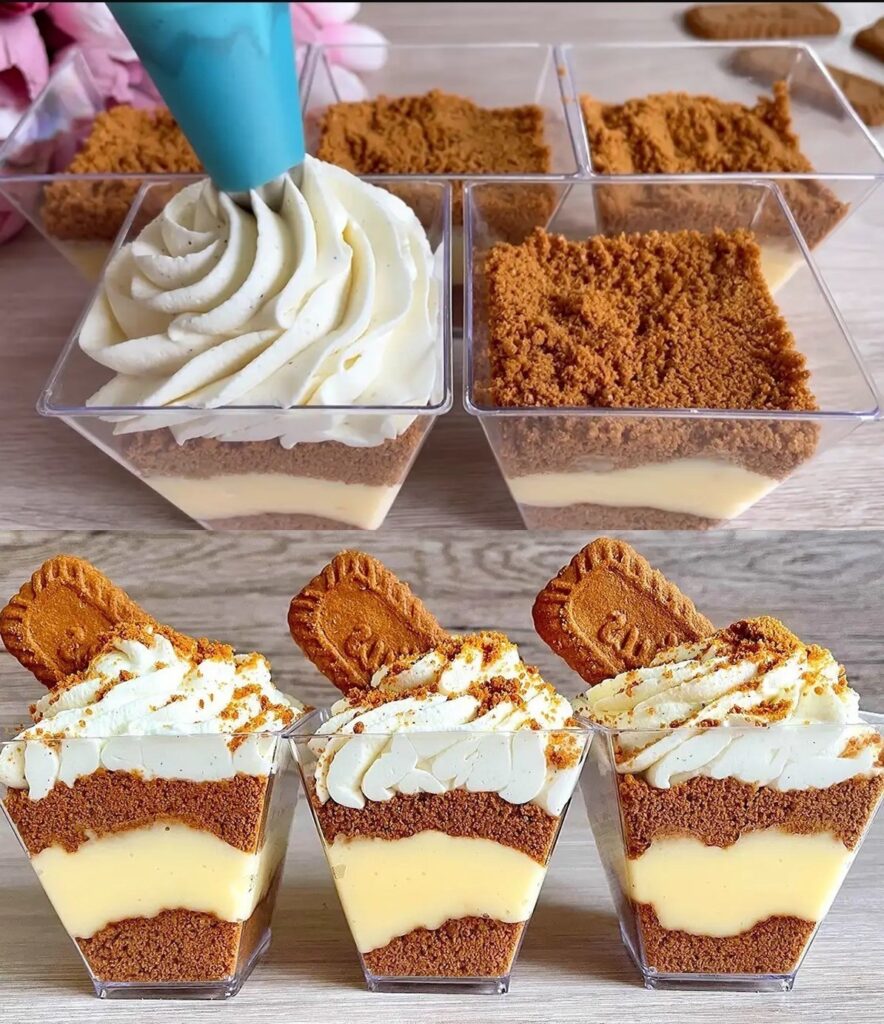
The first step is to create the foundation of your dessert which is the crunchy cookie layer. Take about eighteen or twenty of the Biscoff cookies and place them into a food processor or a sturdy plastic bag. If you use a food processor pulse them until they look like fine sand with just a few small chunks for texture. If you use a bag simply use a rolling pin to crush them until they are uniform. Once you have your crumbs put them into a small mixing bowl and pour in your melted butter. Use a spoon to mix them together until every crumb is coated in butter and the mixture looks like wet sand. Take your serving glasses and divide the crumbs equally among them. Use the back of a small spoon or a heavy flat object to press the crumbs down firmly into the bottom of each glass. This creates a solid base that will not fall apart when you dig in later. Put these glasses into the fridge to chill while you work on the next part of the recipe.
Mixing the Creamy Filling
Now it is time to make the star of the show which is the cheesecake mixture. In a large mixing bowl place your room temperature cream cheese and beat it with a hand mixer or a whisk until it is completely smooth and there are no lumps left. It is very important that the cream cheese is soft or else your cheesecake will be grainy. Add in the one half cup of Biscoff spread along with the powdered sugar and the vanilla extract. Continue to mix these together until the color is a beautiful light brown and everything is well combined. In a separate cold bowl whip your heavy cream until it forms stiff peaks. This means that when you lift the whisk the cream should stand up on its own without falling over. Gently fold the whipped cream into the cream cheese mixture using a spatula. Do not stir too hard because you want to keep the air in the cream to make the cheesecake fluffy. Keep folding until you see no more white streaks and the mixture is one solid color.
Creating the Layers
Retrieve your chilled glasses from the refrigerator. You can now add the cheesecake filling on top of the cookie base. For a very neat look you can put the filling into a piping bag and squeeze it into the glasses. If you do not have a piping bag you can just use a spoon to carefully drop the mixture into the cups. Smooth out the top of the filling with a small knife or the back of a spoon so it is flat. Leave some space at the top of the glass for the final layer of melted spread. Once all the cups are filled you should put them back into the fridge for at least two hours. This chilling time is very important because it allows the cheesecake to set and become firm enough to hold the weight of the topping.
Adding the Topping and Decorating
After the cheesecake cups have chilled and feel firm to the touch you can prepare the final layer. Take the remaining one third cup of Biscoff spread and put it in a microwave safe bowl. Heat it for about twenty or thirty seconds until it becomes liquid and easy to pour. Be careful not to overheat it or it might burn. Let the liquid spread cool down for a minute so it is not boiling hot. Pour a thin layer of this melted spread over the top of each cheesecake cup. Tilt the glasses gently to make sure the spread covers the entire surface evenly. For the finishing touch you can take the remaining cookies and either place a whole one into the side of the cream or sprinkle some extra crumbs around the edges. Put the cups back in the fridge for another thirty minutes to let the top layer set into a beautiful shiny glaze.
Why This Recipe Is Special
This recipe is special because it hits all the right notes for a perfect dessert without requiring a lot of technical skill. One of the best things about it is the texture because you get the crunch of the cookie and the silkiness of the cream in one go. Because we use Biscoff spread inside the cheesecake the flavor is very deep and rich compared to a plain vanilla cheesecake. It has notes of caramel and brown sugar and warm spices like cinnamon and nutmeg which makes it feel very cozy and comforting. From a health perspective while this is an indulgent dessert it is served in small cups which helps with portion control. You can enjoy a full dessert experience without eating a massive slice of cake that might be too much for one person.
Another reason why this recipe stands out is because it is very stable and holds up well for a long time. Unlike some desserts that deflate or get soggy these cups stay delicious for several days in the fridge. This makes them the perfect make ahead dessert for parties or events. You can prepare them a day in advance and they will actually taste better the next day because the flavors have had more time to meld together. The cookies in the base will soften slightly but stay firm enough to provide a nice contrast to the soft filling. Also the use of high quality fats from the cream cheese and the whipping cream provides a feeling of fullness that satisfies your sweet tooth very quickly. It is a premium experience that uses simple grocery store staples to create something that feels very expensive and high end.
Extra Tips for Better Taste
If you want to take your Biscoff cheesecake cups to the next level there are a few creative things you can try. First you can try adding a tiny pinch of sea salt to the cookie crumb base. The salt helps to cut through the sweetness and makes the caramel flavor of the cookies pop even more. Another great tip is to use a mix of smooth and crunchy Biscoff spread if you can find it. Using the crunchy version in the filling adds little bits of biscuit throughout the cream which is a lovely surprise for your guests. If you want a bit of fruit flavor you can add a thin layer of sliced bananas or even some fresh raspberries between the cookie base and the cheesecake filling. The tartness of the berries or the sweetness of the bananas works incredibly well with the spiced cookie flavor.
For the best visual presentation try using clear glass jars or even wine glasses so people can see the distinct layers from the side. You can also experiment with the temperature of the serving. While they should be kept in the fridge taking them out about ten minutes before eating allows the cream cheese to soften just a little bit which makes the texture even more luxurious. If you are making these for a very fancy event you can add some shaved white chocolate on top or a drizzle of dark chocolate to create a beautiful color contrast. You can even swap the butter in the base for coconut oil if you want a slight tropical hint although the butter is more traditional for that rich bakery flavor. Always make sure to use full fat products because the low fat versions often contain more water and will not set as firmly as you need them to for a layered cup.
Final Thoughts
Making these no bake Biscoff layered cheesecake cups is a wonderful way to bring a bit of sweetness into your life. It is a recipe that celebrates simple ingredients and turns them into something truly extraordinary through the power of layering and chilling. Whether you are a beginner who has never made a dessert before or a seasoned baker looking for something quick and easy this recipe will not let you down. The joy of seeing those beautiful layers through the glass and the first taste of that spicy cookie cream is something everyone should experience. It is a reminder that you do not need a lot of heat or a lot of equipment to create a masterpiece in the kitchen. We hope you enjoy making these as much as you enjoy eating them and that they become a staple in your home for years to come.
Nutrition Details
Below is a table that shows the estimated nutrition for one serving of this cheesecake cup. Please remember that these are estimates based on standard ingredients and your results may vary depending on the specific brands you use.
| Nutrient Type | Amount Per Serving |
| Calories | Four hundred and fifty units |
| Total Fat | Thirty two grams |
| Saturated Fat | Eighteen grams |
| Cholesterol | Sixty five milligrams |
| Sodium | Two hundred and ten milligrams |
| Total Carbohydrates | Thirty eight grams |
| Dietary Fiber | One gram |
| Sugars | Twenty six grams |
| Protein | Four grams |
| Vitamin D | Two percent of daily value |
| Calcium | Six percent of daily value |
| Iron | Four percent of daily value |
| Potassium | Two percent of daily value |