ADVERTISEMENT
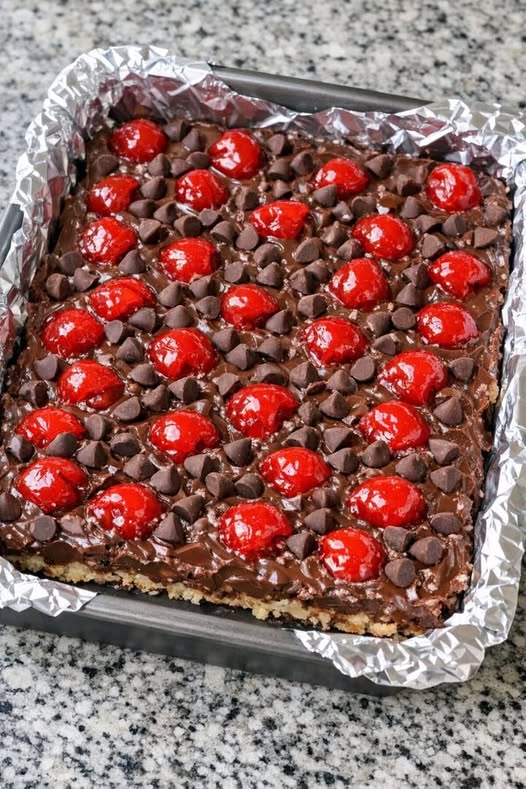
This little pan of 4-ingredient chocolate cherry bars is what my husband calls our “date night classic.” I started making them back in the late ’80s when money was tight and dessert needed to be simple, quick, and special. It’s the kind of Midwest pantry recipe you can pull together in minutes: a boxed cake mix, a can of cherry pie filling, a couple of eggs, and some chocolate chips. No frosting, no fuss—just a fudgy, cherry-studded bar that bakes up in a foil-lined pan and makes the whole kitchen smell like a small-town church supper. To this day, my hubby asks for these more than anything else I make.
Let the bars cool until just slightly warm, then cut them into squares right in the foil-lined pan. They’re lovely served plain with a cup of coffee after dinner, or dressed up for date night with a scoop of vanilla ice cream or a dollop of whipped cream. A drizzle of chocolate syrup over the top turns them into a restaurant-style dessert without any extra work. They also travel well for potlucks or card night—just lift the foil out of the pan, set it on a cutting board, and let everyone help themselves.
4-Ingredient Chocolate Cherry Bars
Servings: 12
Ingredients
1 (15.25–16.5 oz) box chocolate cake mix (devil’s food or regular chocolate)
2 large eggs
1 (21 oz) can cherry pie filling
1 cup semi-sweet chocolate chips
Directions
Line a 9×13-inch baking pan with aluminum foil, letting some hang over the edges to make a sling. Lightly grease the foil with butter or nonstick spray. This makes it easy to lift the bars out later and keeps cleanup simple.
Preheat your oven to 350°F (175°C) while you mix the batter so it’s good and hot when the pan goes in.
In a large mixing bowl, add the dry chocolate cake mix and the eggs. Stir with a sturdy spoon until the eggs are mostly worked in. The mixture will be thick and a bit crumbly at this point.
Spoon in the entire can of cherry pie filling (cherries and all the syrup). Gently fold and stir until everything is well combined and no dry pockets of cake mix remain. The batter will be thick, glossy, and studded with cherries.
Pour the batter into the prepared, foil-lined pan. Use a spatula to spread it out evenly into the corners and smooth the top as best you can.
Sprinkle the chocolate chips evenly over the top of the batter, pressing them in very lightly with your hand or the back of the spatula so they stick but still show on the surface.
Bake on the center rack of the preheated oven for 25–30 minutes, or until the edges are set and pulling slightly away from the foil and the center looks just set. A toothpick inserted into the center will come out with moist crumbs but not wet batter.
Set the pan on a wire rack or cool stovetop and let the bars cool completely in the pan. They will firm up as they cool and be easier to cut.
Once cool, use the foil edges to lift the whole slab of bars out of the pan onto a cutting board. Cut into 12 squares (or smaller pieces if you like). Serve right away or store, covered, at room temperature for up to 3 days.
Variations & Tips
For a richer chocolate flavor, use a dark chocolate or extra-fudgy cake mix and swap semi-sweet chips for dark chocolate chips. If you like a little crunch, sprinkle 1/2 cup chopped walnuts or pecans over the top along with the chocolate chips (this does add a 5th ingredient, but only if you choose). You can also change the personality of the bars by using white chocolate chips instead of regular chocolate, which gives a pretty contrast against the cherries. For a slightly lighter texture, beat the eggs separately until frothy before stirring them into the cake mix, then fold in the cherry pie filling gently. If you’re baking for two and don’t need a full pan, you can halve the recipe and bake it in an 8×8-inch foil-lined pan; start checking for doneness around 22 minutes. These bars also freeze well: cool completely, cut, wrap individually, and tuck into a freezer bag for an easy date-night dessert—just thaw on the counter and warm slightly before serving.
ADVERTISEMENT