
Ingredients for Cottage Cheese Pizza Crust Bowls
Here’s everything you’ll need to make these little pizza miracles—I’ve included my favorite brands and prep tips that make all the difference:
2 cups cottage cheese – I use full-fat for extra creaminess, but low-fat works too (just drain any excess liquid first)
1 cup packed almond flour – Measure it like brown sugar—really press it into the cup for accuracy
1 large egg – Room temperature blends smoother (I just set mine out while preheating the oven)
1 teaspoon garlic powder – The secret flavor booster! Fresh minced garlic works if you’re feeling fancy
1 teaspoon Italian seasoning – My jar is always half-empty because I use it on everything
1/2 teaspoon salt – Trust me, this balances the cottage cheese perfectly
1/4 teaspoon black pepper – Freshly cracked if you’ve got it
1/2 cup shredded mozzarella – Pre-shredded works, but block cheese melts smoother
1/2 cup pizza sauce – My shortcut? Jarred marinara with a pinch of red pepper flakes
1/2 cup diced veggies – Bell peppers, onions, mushrooms—whatever’s wilting in your fridge
1/2 cup cooked protein – Turkey bacon’s our favorite, but leftover rotisserie chicken is gold
What Fans Should Know About The Stuffed Crust From Pizza Hut
Pro tip: Keep toppings diced small—big chunks make the bowls harder to eat. And yes, you can totally go meatless if that’s your jam!
How to Make Cottage Cheese Pizza Crust Bowls
Alright, let’s get these pizza bowls happening! I promise it’s easier than folding a fitted sheet—just follow these simple steps and you’ll have crispy, cheesy goodness in no time.
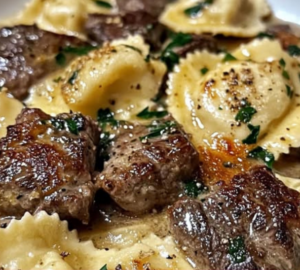
Cottage Cheese Pizza Crust Bowls – detail 2
Step 1: Prepare the Dough
First, grab your biggest mixing bowl—trust me, you’ll need the space! Dump in the cottage cheese (don’t worry if it looks lumpy—that’s part of the charm), almond flour, egg, and all those glorious seasonings. Now roll up your sleeves and mix it like you mean it! You’re looking for a thick, slightly sticky dough that holds together when you pinch it. Pro tip: If it seems too wet, add another tablespoon of almond flour. Too dry? A splash of water works wonders.
Step 2: Shape and Bake the Crust
Here’s where the magic happens! Spray that muffin tin like you’re preparing for a nonstick revolution—these little bowls like to stick if you’re not generous. Scoop about 1/4 cup of dough into each cup, then use slightly damp fingers to press it up the sides, forming perfect little bowls. Don’t stress about perfection—rustic is charming! Pop them in the oven at 375°F for 20 minutes until they’re golden and firm to the touch. Oh, and resist the urge to fill them immediately—let them cool for 5 minutes so they hold their shape (I learned this the hard way with a collapsed bowl tragedy!).
Step 3: Add Toppings and Finish Baking
Ezoic
Now the fun part—decorate your edible bowls like tiny pizza canvases! Start with a spoonful of sauce (about 1 tablespoon per bowl), then pile on those veggies and protein. Top it all with a generous sprinkle of mozzarella—this is no time to be shy! Slide them back into the oven for 10 more minutes, just until the cheese gets all bubbly and slightly golden. Your kitchen will smell like a pizzeria, and your family will come running!
Tips for Perfect Cottage Cheese Pizza Crust Bowls
After making these dozens of times (and yes, having a few hilarious fails along the way), here are my absolute must-know tips for pizza bowl success:
Grease like you mean it: That muffin tin needs more spray than you think—get into every nook and cranny! I learned this after spending 10 minutes prying out a bowl that fused itself to the pan. A light dusting of almond flour after greasing gives extra insurance.
Topping freedom is key: These bowls are basically edible blank canvases. My kids go wild making “pizza art” with their toppings—heart-shaped pepperoni for Valentine’s Day, smiley faces with olives. Leftover taco meat? Brilliant. Last night’s roasted veggies? Perfect. Even breakfast versions with scrambled eggs work!
The cooling patience test: I know, I know—you want to dig in immediately. But letting the crusts cool for 5 minutes after the first bake makes them sturdy enough to hold toppings without collapsing. Set a timer if you’re impatient like me!
Leftover magic: These keep surprisingly well! Store cooled bowls (without toppings) in an airtight container for up to 3 days. When ready, add fresh toppings and rebake for 8 minutes. They won’t be quite as crisp, but still delicious—my husband microwaves his for 30 seconds when he’s extra hungry.
Variations for Cottage Cheese Pizza Crust Bowls
One of my favorite things about these pizza bowls is how easily they adapt to whatever’s in your fridge or dietary needs—I’ve tested all these swaps myself, and they all work like a charm!
Flour alternatives: Ran out of almond flour? No sweat! Try these:
Cauliflower rice: Squeeze it super dry (I use a clean kitchen towel) and use 1 1/4 cups—the texture gets extra crispy!
Oat flour: Grind rolled oats in your blender for 1 cup—adds a nice nutty flavor
Whole wheat flour: Use 3/4 cup since it absorbs more liquid—perfect when you want that classic pizza dough vibe
Dairy-free delight: My vegan sister swears by these tweaks:
Tofu ricotta: Blend 1 1/2 cups silken tofu with 1 tbsp lemon juice instead of cottage cheese
Vegan cheese: Violife mozzarella shreds melt beautifully on top
Nutritional yeast: Add 2 tbsp to the crust mix for that cheesy flavor boost
Protein power-ups: When we’re feeling extra hungry, I’ll:
Mix 1/4 cup protein powder into the dough (vanilla works shockingly well!)
Use Greek yogurt instead of egg for an extra protein punch
Top with double the meat—my husband’s “meat mountain” version is legendary
Flavor adventures: Sometimes I’ll:
Swap Italian seasoning for taco seasoning and top with salsa
Add sun-dried tomatoes and pesto for a Mediterranean twist
Make dessert versions with cinnamon and top with yogurt and berries
The possibilities are endless—once you master the basic method, you’ll start seeing pizza bowl potential everywhere! Just remember: however you tweak it, keep that cottage cheese-to-dry ingredient ratio balanced, and you’re golden.
Serving Suggestions
Okay, let’s talk about how to make these pizza bowls the star of your table! We’ve devoured these every which way—here are my family’s favorite serving ideas:
Meal-worthy pairings: For a complete dinner, I love serving two bowls per person alongside:
A big chopped Italian salad with lots of crunchy romaine, cherry tomatoes, and pepperoncini
Roasted garlic broccoli (toss florets with olive oil and garlic powder at 400°F for 15 minutes)
Simple cucumber slices with hummus for dipping—my kids call this “pizza and pickles” night
Snack attack solutions: When we’re grazing (hello, game day!), I’ll:
Cut each bowl into quarters for perfect bite-sized pizza dippers
Serve with marinara, ranch, or even buffalo sauce for dunking
Pair with crisp apple slices to balance the richness
Portion pro tips: Here’s how we divvy them up:
Adults: 2-3 bowls makes a satisfying meal (my husband usually goes for three!)
Kids: 1 bowl plus sides keeps my 5-year-old happy
Appetizers: Half bowls are perfect for parties—just bake in a mini muffin tin
The beauty is that these work however you need them to—hearty dinner, light lunch, or even breakfast (yes, we’ve done morning pizza bowls with scrambled eggs inside!). However you serve them, just be ready for everyone to ask for seconds.
Storage and Reheating
Let me tell you—these pizza bowls are almost better the next day! Here’s exactly how I store and revive them to keep that perfect texture:
Fridge magic: Once cooled, I store the un-topped crusts in an airtight container with a paper towel underneath (absorbs any moisture). They’ll stay crisp for up to 3 days this way. Pro tip: If you’ve already added toppings, just know the crust will soften—still tasty, but not as crunchy.
Freezer hack: For longer storage, freeze the baked crusts on a tray first (so they don’t stick together), then transfer to a freezer bag. They’ll keep for 2 months! Thaw overnight in the fridge before topping and baking.
Reheating like a pro: My two favorite methods:
Oven method: 350°F for 8-10 minutes—gets them crispy again! Perfect when I’m reheating a whole batch.
Microwave quick-fix: 30-45 seconds for that “I need pizza NOW” emergency. The crust softens, but the melty cheese makes up for it!
One warning—the microwave can make them a bit soggy, so I always pop them under the broiler for a minute afterward if I have time. Works like a charm!